
A Simple Guide to Calculating Projector Throw Ratios
In this comprehensive guide, we will explore the concept of projector throw ratios, their importance, and how to calculate them accurately.

When setting up a projector for your home theater, office, or event space, one of the most important factors to consider is the projector throw ratio. The throw ratio determines the size of the projected image based on the distance between the projector and the screen. Understanding and calculating the throw ratio is crucial for achieving the desired image size and ensuring optimal viewing experience.
In this comprehensive guide, we will explore the concept of projector throw ratios, their importance, and how to calculate them accurately. We will also discuss the significance of projector throw distance and its impact on image quality. Additionally, we will delve into the role of AV system integration software in simplifying the process of determining the ideal projector setup for your specific needs.
What is a Projector Throw Ratio?
A projector throw ratio is a mathematical expression that represents the relationship between the distance of the projector from the screen and the width of the projected image. In simpler terms, it indicates how far the projector needs to be from the screen to produce an image of a specific size.
The throw ratio is typically expressed as a number followed by a colon and another number, such as 1.5:1 or 2.0:1. The first number represents the distance between the projector and the screen, while the second number represents the width of the projected image.
For example, if a projector has a throw ratio of 1.5:1, it means that for every 1.5 feet of distance between the projector and the screen, the image width will be 1 foot. So, if you place the projector 15 feet away from the screen, the resulting image will be 10 feet wide.
Why is Calculating Projector Throw Ratios Important?
Calculating projector throw ratios is essential for several reasons:
Determining the Optimal Projector Placement: By knowing the throw ratio, you can determine the ideal distance to place your projector from the screen to achieve the desired image size. This ensures that you have sufficient space to accommodate the projector and helps you plan your room layout accordingly.
Selecting the Right Projector: Different projectors have varying throw ratios. Understanding the throw ratio requirement for your specific setup allows you to choose a projector that is compatible with your space constraints and desired image size.
Achieving the Desired Image Size: The throw ratio directly impacts the size of the projected image. By calculating the throw ratio, you can ensure that the image fits perfectly on your screen without any unnecessary overspill or undersizing.
Optimizing Image Quality: Projectors have a specific range of throw distances within which they perform optimally. By calculating the throw ratio and positioning the projector within the recommended range, you can achieve the best possible image quality, sharpness, and brightness.
How to Calculate Projector Throw Ratios
Calculating the projector throw ratio is a straightforward process. Follow these steps to determine the throw ratio for your setup:
Measure the Distance: Measure the distance between the projector and the screen in feet. This is your projector throw distance. Make sure to measure from the projector's lens to the screen surface.
Measure the Image Width: Measure the width of the projected image on the screen in feet. This is the width of the actual image, not the width of the screen itself.
Divide the Distance by the Width: Divide the projector throw distance by the image width. The result is your projector throw ratio.
Here's the formula for calculating the throw ratio:
Throw Ratio = Projector Throw Distance / Image WidthFor example, if your projector is placed 12 feet away from the screen and the image width is 8 feet, the throw ratio would be:Throw Ratio = 12 feet / 8 feet = 1.5:1This means that for every 1.5 feet of distance between the projector and the screen, the image width will be 1 foot.
Factors Affecting Projector Throw Ratios
Several factors can influence the projector throw ratio and the overall projection setup. Let's explore some of these factors:
1. Projector Lens
The type of lens used in the projector plays a significant role in determining the throw ratio. Projectors come with different lens options, such as standard, short-throw, and ultra-short-throw lenses.
Standard Lenses: These lenses have a throw ratio ranging from 1.5:1 to 3:1. They are suitable for most common room sizes and provide a good balance between image size and projector distance.
Short-Throw Lenses: Short-throw lenses have a throw ratio between 0.5:1 and 1:1. They allow you to place the projector closer to the screen while still achieving a large image size. Short-throw lenses are ideal for smaller rooms or situations where the projector needs to be placed near the screen.
Ultra-Short-Throw Lenses: Ultra-short-throw lenses have a throw ratio of less than 0.5:1. They enable you to position the projector extremely close to the screen, often just a few inches away. Ultra-short-throw projectors are perfect for tight spaces or when you want to minimize the visibility of the projector.
2. Screen Size
The size of your projection screen directly affects the throw ratio calculation. A larger screen will require a longer throw distance or a projector with a shorter throw ratio to maintain the same image size.
When selecting a screen size, consider the dimensions of your room and the viewing distance of your audience. A screen that is too small may result in an unsatisfactory viewing experience, while an excessively large screen may overpower the room and strain viewers' eyes.
3. Projector Resolution
The resolution of your projector can also impact the throw ratio considerations. Higher resolution projectors, such as 4K or 8K models, require a larger screen or a shorter throw distance to showcase their enhanced detail and clarity.
When pairing a high-resolution projector with a screen, ensure that the screen material and gain are compatible with the projector's specifications. A screen with the appropriate gain and texture will help maximize the benefits of the high-resolution projection.
4. Ambient Light
Ambient light in the projection environment can affect the perceived image quality and throw ratio requirements. In rooms with high levels of ambient light, you may need a projector with a higher light output or a screen with a higher gain to maintain image brightness and contrast.
If you have control over the lighting conditions, consider installing light-blocking curtains or shades to minimize the impact of ambient light on the projection. This will allow you to achieve optimal image quality and potentially use a projector with a longer throw ratio.
The Role of AV System Integration Software
AV system integration software plays a crucial role in simplifying the process of calculating projector throw ratios and determining the ideal setup for your specific needs. These software tools provide a range of features and benefits that streamline the planning and installation of projection systems.
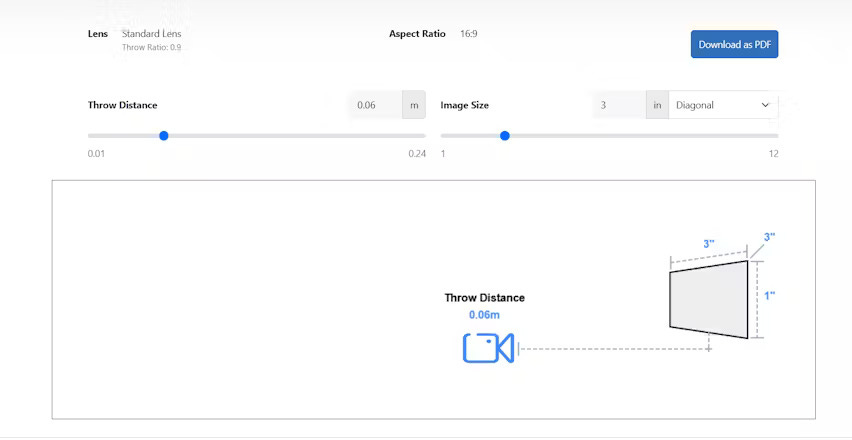
1. Throw Ratio Calculators
Many AV system integration software solutions include built-in throw ratio calculators. These calculators allow you to input your room dimensions, screen size, and desired image size, and they automatically calculate the required throw ratio for your setup.
Throw ratio calculators eliminate the need for manual calculations and provide accurate results based on your specific parameters. They take into account factors such as screen aspect ratio, projector lens type, and image offset, ensuring precise recommendations for your projection needs.
2. Virtual Room Layout
AV system integration software often features virtual room layout tools that enable you to visualize your projection setup in a digital environment. These tools allow you to create a virtual representation of your room, including dimensions, furniture placement, and screen location.
By using virtual room layout features, you can experiment with different projector positions, screen sizes, and throw ratios to find the optimal configuration for your space. You can visualize the projected image size, assess potential obstacles, and make informed decisions about your setup before physically installing any equipment.
3. Product Databases and Compatibility
AV system integration software often includes extensive product databases that provide detailed specifications and compatibility information for a wide range of projectors, screens, and accessories. These databases allow you to easily compare different projector models, their throw ratios, and other key features.
By leveraging product databases, you can ensure that the projector you select is compatible with your screen size, room dimensions, and desired throw ratio. You can also explore alternative options and make informed decisions based on factors such as brightness, resolution, and cost.
4. Collaboration and Documentation
AV system integration software facilitates collaboration among team members involved in the projection setup process. It allows multiple users to access and contribute to the project, sharing ideas, designs, and feedback in real-time.
Moreover, these software solutions often provide documentation features that enable you to generate detailed project reports, including equipment lists, installation instructions, and system diagrams. These documents serve as valuable references during the installation process and for future maintenance and upgrades.
User Case Studies
To further illustrate the importance of calculating projector throw ratios and the benefits of using AV system integration software, let's explore a few user case studies:
Case Study 1: Home Theater Setup
John, a home theater enthusiast, wanted to create the ultimate cinematic experience in his living room. He had a 120-inch screen and a room length of 15 feet. John used an AV system integration software with a throw ratio calculator to determine the ideal projector placement.
The software recommended a projector with a throw ratio of 1.8:1, which would allow John to position the projector approximately 13.5 feet away from the screen. By following the software's guidance, John achieved a perfectly sized image that filled his screen and delivered an immersive viewing experience.
Case Study 2: Conference Room Upgrade
Sarah, an IT manager at a corporate office, was tasked with upgrading the conference room's projection system. The room had limited space, and the existing projector was causing image distortion and poor visibility.
Sarah utilized an AV system integration software to explore different projector options and simulate the room layout. The software suggested a short-throw projector with a throw ratio of 0.6:1, which would allow the projector to be placed just 4 feet away from the 100-inch screen.
By implementing the software's recommendation, Sarah successfully upgraded the conference room's projection system, providing clear and vibrant visuals for presentations and meetings.
Case Study 3: Educational Institution
Michael, an AV technician at a university, was responsible for setting up projection systems in multiple classrooms across the campus. Each classroom had different dimensions and seating arrangements, making it challenging to determine the optimal projector placement.
Michael relied on an AV system integration software to streamline the process. The software's throw ratio calculator and virtual room layout features allowed him to quickly assess each classroom's requirements and identify the most suitable projector and screen combination.
By leveraging the software's capabilities, Michael efficiently set up projection systems in all the classrooms, ensuring consistent image quality and visibility for students and faculty.
Conclusion
Calculating projector throw ratios is a critical step in setting up a projection system that delivers optimal image size, quality, and viewing experience. By understanding the concept of throw ratios and how to calculate them, you can make informed decisions about projector placement, screen size, and equipment selection.
AV system integration software plays a vital role in simplifying the process of determining the ideal projector setup. With features like throw ratio calculators, virtual room layouts, and product databases, these software solutions streamline the planning and installation of projection systems, saving time and ensuring accurate results.
Whether you're setting up a home theater, upgrading a conference room, or outfitting educational facilities, calculating projector throw ratios and utilizing AV system integration software will help you achieve the best possible projection outcomes.
Frequently Asked Questions (FAQs)
What is the difference between a short-throw and a long-throw projector? A short-throw projector has a throw ratio of less than 1:1, allowing it to be placed closer to the screen while still producing a large image. On the other hand, a long-throw projector has a throw ratio greater than 1:1 and requires a longer distance from the screen to achieve the same image size.
Can I use a projector with any screen size? While projectors can work with various screen sizes, it's important to consider the throw ratio and the projector's specifications. Each projector has a recommended range of screen sizes that it can accurately project onto. Choosing a screen size that is too small or too large for your projector can result in image quality issues or difficulty in achieving the desired image size.
How do I determine the ideal screen size for my room? To determine the ideal screen size for your room, consider factors such as the room dimensions, seating distance, and the projector's throw ratio. A general rule of thumb is to choose a screen size that allows the closest viewer to be at least 1.5 times the screen width away and the farthest viewer to be no more than 5 times the screen width away.
What is the impact of ambient light on projection? Ambient light can significantly affect the quality and visibility of the projected image. High levels of ambient light can wash out the image, reduce contrast, and make it difficult to see details. To minimize the impact of ambient light, consider using a projector with high brightness (measured in lumens), installing light-blocking curtains or shades, and positioning the screen away from direct light sources.
How do I calculate the throw distance for my projector? To calculate the throw distance for your projector, you'll need to know the throw ratio and the desired image width. Multiply the throw ratio by the image width to determine the throw distance. For example, if your projector has a throw ratio of 1.5:1 and you want a 100-inch wide image, the throw distance would be 1.5 times 100 inches, which equals 150 inches or 12.5 feet.
Can I use a projector in a small room? Yes, you can use a projector in a small room. However, you'll need to choose a projector with a short throw ratio or an ultra-short-throw projector to achieve a large image size in a limited space. Short-throw and ultra-short-throw projectors allow you to place the projector closer to the screen, making them ideal for small rooms or tight spaces.
What is the difference between 4:3 and 16:9 aspect ratios? Aspect ratio refers to the proportional relationship between the width and height of the projected image. A 4:3 aspect ratio means the image is 4 units wide and 3 units tall, while a 16:9 aspect ratio indicates that the image is 16 units wide and 9 units tall. The 16:9 aspect ratio is commonly used for widescreen content, such as HDTV and movies, while the 4:3 aspect ratio is more common for standard definition content and presentations.
How do I ensure my projector and screen are compatible? To ensure compatibility between your projector and screen, consider the following factors:
Aspect Ratio: Make sure the projector and screen have the same aspect ratio (e.g., 4:3 or 16:9) to avoid image distortion or black bars.
Screen Gain: Choose a screen with an appropriate gain (reflectivity) that matches your projector's specifications and the ambient light conditions in your room.
Screen Size: Ensure that the screen size falls within the recommended range for your projector's throw ratio and brightness.
Resolution: Select a screen that can display the projector's native resolution without compromising image quality.
By considering these factors and consulting the manufacturer's guidelines, you can ensure compatibility between your projector and screen for optimal performance.
Conclusion
In conclusion, calculating projector throw ratios is an essential step in setting up a projection system that delivers the desired image size, quality, and viewing experience. By understanding the concept of throw ratios and how to calculate them accurately, you can make informed decisions about projector placement, screen size, and equipment selection.The importance of projector throw distance cannot be overstated, as it directly impacts the size and quality of the projected image. By using AV system integration software and tools like throw ratio calculators and virtual room layouts, you can streamline the process of determining the ideal setup for your specific needs.
Whether you're a home theater enthusiast, an IT professional upgrading a conference room, or an AV technician outfitting educational facilities, mastering the art of calculating projector throw ratios will help you achieve the best possible projection outcomes.
Remember to consider factors such as ambient light, screen size, and projector resolution when making your calculations. By taking a comprehensive approach and leveraging the power of AV system integration software, you can create projection setups that deliver stunning visuals and captivate your audience.
So, embrace the knowledge of projector throw ratios, experiment with different configurations, and unlock the full potential of your projection system. With the right tools and understanding, you can transform any space into an immersive visual experience that leaves a lasting impact.